Search This Blog

Wednesday, July 27, 2011

Recipe Wednesday! Corny ideas for you...

This wonderfully EASY recipe is from a tearoom, where it was a customer FAVORITE! Try it at home with some FRESH corn off the cob!


SUPER-QUICK CORN CHOWDER
(Made in the Microwave!!!)

Ingredients:

2 cups water
2 cups diced peeled potatoes
1/2 cup sliced carrots
1/2 cup sliced celery
1/4 cup chopped onion
1 teaspoon salt
1/4 teaspoon pepper
1/4 cup butter or margarine
1/4 cup all-purpose flour
2 cups milk
3 cups shredded Cheddar cheese
2 (14.75 ounce) cans cream-style corn
1 cup cooked fresh-off-the-cob corn

Directions:

Place water in a 2-qt. microwave-safe dish; cover and heat until boiling. Add potatoes, carrots, celery, onion, salt and pepper. Cook, uncovered, on high for 8-10 minutes or until vegetables are crisp-tender; set aside (do not drain).
Meanwhile, in a 3-qt. dish, microwave butter on high for 50-60 seconds or until melted. Stir in flour until smooth. Gradually stir in milk. Cook, uncovered, on high for 6-7 minutes or until thickened, stirring every 2 minutes. Add the cheese. Heat for 1 to 1-1/2 minutes or until the cheese is melted. Stir in the corn and reserved vegetables. Cook on high for 2-3 minutes or until heated through.

*********************************

TIP: Make these for breakfast with the corn from those leftover ears you boiled from last night's dinner!

CORN FRITTERS


Ingredients:

3 cups oil for frying
1 cup sifted all-purpose flour
1 teaspoon baking powder
1/2 teaspoon salt
2 tablepoons sugar
1 egg, lightly beaten
1/2 cup milk
1 tablespoon shortening, melted
1 1/2 cups cooked corn off-the-cob (OR: 1 - 12. oz. can kernel corn, drained)

Directions:

Heat oil in a heavy pot or deep fryer to 365 degrees F (185 degrees C).
In a medium bowl, combine flour, baking powder, salt and sugar. Beat together egg, milk, and melted shortening; stir into flour mixture. Mix in the corn kernels.
Drop fritter batter by spoonfuls into the hot oil, and fry until golden. Drain on paper towels.

"Farming looks mighty easy when your plow is a pencil and you're a thousand miles from the corn field."
~Dwight D. Eisenhower

Wednesday, July 20, 2011

Recipe Wednesday! Ingredients for FUN this week, not FOOD!

So, these aren't EXACTLY food recipes, but I'm sure you'll use them nonetheless!
As an art teacher, I collected LOTS of inexpensive recipes for art supplies. One of these is for BUBBLES and one is for PLAY CLAY, so grab the ingredients, round up your curtainclimbers, and have a blast. Three cheers for CHEAP summer fun!


THE BEST BUBBLES EVER!

Ingredients:

6 cups water
2 cups Dawn dishwashing liquid
3/4 cup light corn syrup

Directions:

Mix all ingredients together in a LARGE container of sorts...an empty water bottle, milk jug, etc. Shake everything up and let sit for a few hours. Pour into empty bubbles containers or dishes and go wild with your bubble wands!!

(Many thanks and credit goes to www.smashedpeasandcarrots.blogspot.com for the recipe! Check out her cool site, too!)

*********************************


Make-Your-Own PLAY CLAY!

(This makes a soft and squishy clay that can be used over and over again and will remain pliant for weeks, but dries eventually.)

Materials:

1 cup flour
1 cup water
1/2 cup salt
1 tsp. vegetable oil
1/2 tsp. cream of tartar
Food coloring, optional

Directions:

Mix all ingredients together in a saucepan and cook over medium heat until the mixture holds together. (Keep mixing or it will stick to the bottom of the pan!)
When the clay is cool enough to touch, your child can knead it on a floured board. This recipe's long drying time makes it most satisfying as a play dough (it's easy to roll into ropes and balls), but sculptures will dry eventually. If stored in an airtight container, this dough will last, refrigerated or unrefrigerated, for 2 to 4 weeks.

"Work consists of whatever a body is obliged to do. Play consists of whatever a body is not obliged to do."
~Mark Twain

Friday, July 15, 2011

BONUS Recipe: Great-Grandma's Black Rasberry "Pudding" (Cobbler)

An added BONUS recipe for your black rasberries! This is a VERY old family recipe, that was passed down to my great-grandma, Florence Lucy Kyler. Serve it hot in a bowl, with fresh milk poured over the top. Not overly sweet, just perfect comfort food! Bon appetit!


BLACK RASBERRY PUDDING

Ingredients:

1 quart sweetened black rasberries
2 eggs
1 c. sugar
1 c. milk
1 Tbsp. melted butter
2 Tbsp. baking powder
2 c. flour
1 tsp. vanilla
cinnamon sugar for sprinkling on top

Directions:

Put rasberries into a 9 x 13" greased baking dish. Mix the rest of ingredients gently, and pour over berries. Sprinkle cinnamon sugar over the top. Bake @ 350 degrees F until lightly browned on top. Serve hot in bowls, with 1/2 cup milk poured over the top. Or be decadent and use whipped cream or ice cream!

"We would load up the yellow Cutlass Supreme station wagon and pick blackberries during blackberry season or spring onions during spring onion season. For us, food was part of the fabric of our day."
~Mario Batali

Wednesday, July 13, 2011

Recipe Wednesday! Wahoo! Black Rasberries, my absolute FAVORITE!


I think this is quite possibly - Yes, most definitely - my favorite fruit of ALL!
Those perfect little black clusters of juicy goodness are ripe and ready to pick! Black rasberry bushes are currently loaded down, so grab 'em before the birds do! Get yourself out there and scope for bushes. Old fencelines are perfect places, as are streambeds, runoff ditches, and spaces underneath where wild birds perch - that's how those bushes got planted in the first place! I know, I know - TMI, right? Don't forget to stash some away in your freezer - nothing tastes better in the middle of winter!


BLACKBERRY SYRUP (for pancakes!)

Ingredients:

4 cups blackberry juice
4 cups white sugar
1/3 (2 ounce) package powdered pectin (optional)

Directions:

Mix the blackberry juice and sugar, bring to a boil. Boil rapidly for 2 minutes. Skim off foam. Pour into HOT sterile jars or bottles.
This makes a thin syrup (like true maple syrup). If you want it slightly thicker, you can add a small amount of powdered pectin (less than half a 2 ounce box) to the cold syrup and sugar mixture.
You can store the syrup in the refrigerator if you intend to use it quickly. To preserve for a longer time, sterilize the jars, pour into the canning jars to within 1/4 inch of lid, adjust lids and process in boiling water canner for 10 minutes.

************************************


AND>>> to serve with your yummy syrup, try these!
Make your own mix and save mucho money!!

HOMEMADE PANCAKE MIX

Ingredients:

4 cups all-purpose flour
2 cups whole wheat flour
2/3 cup sugar
2 tablespoons baking powder
1 tablespoon baking soda

Additional ingredients for pancakes:
1 egg
3/4 cup milk

Directions:

In a bowl, combine the first five ingredients. Store in an airtight container in a cool dry place for up to 6 months.
To prepare pancakes: In a bowl, combine egg and milk. Whisk in 1 cup pancake mix. Pour batter by 1/4 cupfuls onto a lightly greased hot griddle; turn when bubbles form on top of pancakes. Cook until second side is golden brown. Serve warm with butter and syrup!

***************************
"Thanks. Rasberry. Great."
~Bill Murray in Groundhog Day

Wednesday, July 6, 2011

Recipe Wednesday! Konnichi Wa! Chicken, Japanese-style!

Zooming around the world today, here are some JAPANESE chicken recipes for you! My son loves all things Japanese, and he is a sushi freak - he even wants to move there to study! So, in honor of Kyler, here are some easy, yummy takes on "niwatori"!


CHICKEN AND EGG WITH RICE (Oyako-don)

Ingredients:

2 boneless, skinless chicken breasts
1 onion
4 eggs
4 Tbsp. soy sauce
4 Tbsp mirin (you can substitute sake, with a pinch of sugar added, or use sweet white wine)
1 1/2 cups chicken stock
4 bowls of steamed rice

Directions:

1. Cut the chicken into bite-size pieces and thinly slice the onion.
2. Place the stock, soy sauce and mirin into a saucepan and bring to a boil.
3. Add the chicken and onion slices and simmer for 5 minutes.
4. Beat the eggs in a small bowl.
5. Bring the soup to a boil, then pour the eggs over the mixture in the pan.
6. Reduce the heat and put on a lid.
7. After one minute, turn off the heat.
8. Divide the mixture into four parts equally, and serve on top of the steamed rice bowls.

********************************


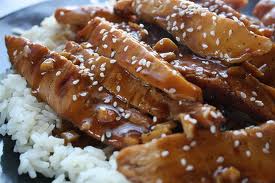
TERIYAKI CHICKEN

Ingredients:

4 chicken breasts, whole
4 Tbsp soy sauce
2 Tbsp. sake
4 Tbsp mirin
2 Tbsp sugar
1 tsp. grated ginger
toasted sesame seeds for garnish, optional

Directions:

1. Poke the chicken all over with a fork.
2. Mix the rest of the ingredients in a bowl.
3. Marinate the chicken in the mixtur for 30 minutes.
4. Heat oil in a frying pan.
5. Grill the skin side of the chicken first, on medium, then turn and grill the other side.
6. Pour the marinating sauce into the pan, then cover and steam cook the chicken for five minutes.
7. Remove from heat, and slice the chicken. Sprinkle with toasted sesame seeds, and serve over rice - serves four.

********************************


FRIED CHICKEN (Kara-age)

Ingredients:

8 boneless chicken thighs
4 Tbsp. soy sauce
4 Tbsp. sake
2 tsp. grated ginger
1/2 cup cornflour

Directions:

1. Cut the chicken into bite-size pieces.
2. Mix the ginger, soy sauce and sake.
3. Marinate the chicken in the mixture for 30 minutes.
4. Heat oil to 340 degrees.
5. Pat the chicken dry with a paper towel, and coat generously with cornflour.
6. Deep fry the chicken for about 5 minutes, until crisp and golden.

***********************************

"As long as the food is well prepared and not overdone, I think it tastes good. It doesn't matter if it's Chinese, Japanese, anything."
~Martin Yan

Wednesday, June 29, 2011

Recipe Wednesday! Attack of the Endless Zucchini has begun!

That's right, it's BAAAACKKKK! Here are two recipes that use up a LOT, one for Chocolate Cake with Cream Cheese Frosting, and another for Easy-Cheesy Lasagna! So, you've probably seen recipes for No-Noodle Lasagna. Just replace the noodles with thinly sliced zucchini or yellow squash, add lasagna layers and VOILA! The PROBLEM is, the squash becomes watery when cooked, and you end up with lasagna SOUP instead! MY solution? Layer the squash, with lasagna noodles on top of it. The extra water content cooks the noodles! Am I brilliant or what? Wait, don't answer
that - I forgot to post my recipes last week!

EASY-CHEESY LASAGNA WITH ZUCCHISY!


Ingredients:

1 lb. cooked mild italian sausage (unless you like it spicy!)
2 small zucchini or yellow squash, thinly sliced into rounds (peel it first if you'd like)
2 jars spaghetti sauce, your favorite
1 package UNCOOKED lasagna noodles
2 c. shredded mozzerella, or 1 pkg. sliced mozzerella
1 24 oz. container cottage cheese (or ricotta)
3 eggs, beaten
1 tsp. italian seasoning

Directions:

Mix together the last three ingredients in a small bowl to form the "cream" layer - the cottage cheese, eggs and italian seasoning.
Coat a REALLY REALLY big lasagna pan with cooking spray. Mine is
huge, but you can also use 2 pans and bake one/freeze one!
Layer the ingredients like this:

sauce
squash
uncooked noodles
cream
sausage
mozzerella

I layer them three times, making sure each layer covers the pan evenly. Bake for 1 1/2 - 2 hours at 400 F, or if using 2 pans, 1 hour. It should be thick and bubbly when finished! Serve hot, and leftovers are even better! Freeze some slices for lunches!

*********************************

This cake is MOIST and FUDGY and it uses THREE CUPS of zucchini! I frost it with cream cheese frosting, and cut it right in the pan - YUMMO!

CHOCOLATE ZUCCHINI CAKE


Ingredients:

2 cups all-purpose flour
2 cups white sugar
3/4 cup unsweetened cocoa powder
2 teaspoons baking soda
1 teaspoon baking powder
1/2 teaspoon salt
1 teaspoon ground cinnamon
4 eggs
1 1/2 cups vegetable oil
3 cups grated zucchini
3/4 cup chopped walnuts

Directions:

Preheat oven to 350 degrees F (175 degrees C). Grease and flour a 9x13 inch baking pan.
In a medium bowl, stir together the flour, sugar, cocoa, baking soda, baking powder, salt and cinnamon. Add the eggs and oil, mix well. Fold in the nuts and zucchini until they are evenly distributed. Pour into the prepared pan.
Bake for 50 to 60 minutes in the preheated oven, until a knife inserted into the center comes out clean. Cool cake completely before frosting with your favorite frosting. Chocolate or cream cheese are both delicious!

“He probably gave away 55 zucchini last year. The garden was huge. It was higher than him. Even if he was standing up in it, you had to look to find him. We're going to miss it.”
~Lucille Mancke

Wednesday, June 15, 2011

Recipe Wednesday! Wild Strawberry Fruit Leather and Fool! (the dessert, not the insult)

These bright little GEMS are just starting to ripen in our area. We LOVE eating them fresh, if we can beat our free-ranging poultry to them first!

An old-time way to preserve wild strawberries is by making STRAWBERRY LEATHER. This method was used in Europe and by the Indians. The colonists soon were preserving berries this way, too. The berries were dried into thin cakes the size of pancakes. Then they were eaten that way or made into sauces, pies, and puddings.
Wild strawberries have been used for many purposes over the years - strawberry wines, strawberries and cream, strawberry jams and jellies, strawberry shortcake, etc. Strawberries are high in vitamin C. The leaves, nutritious, too, have been used for strawberry tea, a drink rich in this vitamin.
Strawberry juice was used in years past as a wash for the complexion. The roots and leaves have been utilized as an astringent.
Wild strawberries are very fragile berries. They get mushy very quickly. So these berries should be handled carefully when picked and transported. They also should be used, either eaten or preserved as soon as possible.

WILD STRAWBERRY FRUIT LEATHER


Ingredients:

2 pounds hulled strawberries
1 cup sugar

Directions:

In a pan, simmer 2 pounds hulled strawberries with 1 cup sugar over low heat. Stir and mash fruit as it cooks and gets as thick as possible.

Then spread the mixture on a flat dish and place in the sun, a food dryer, or low 200 degree oven. When dried, sprinkle with powdered sugar and cut into squares. Store in covered container to keep out moisture.

(-adapted from www.oldfashionedliving.com)


EASY WILD STRAWBERRY FOOL

Ingredients:

1/2 lb wild strawberries
1 tsp sugar
1/2 pint whipping cream
A few berries and a little grated chocolate for garnish

Directions:

Wash the strawberries, de-husk them and slice them to about 1/8". Add them to a pot with the tsp. of sugar and gently bring up to heat. (No water is required, as the natural juices of the strawberries will be sufficient.)
The strawberries should be stirred regularly with a wooden spoon as they begin to break down, and after around five minutes, should have pureed sufficiently. Note that some solid pieces remaining add a little bit of bite and character to the finished dish. Set the puree, covered, aside to cool. This will take at least half an hour.
When the strawberry puree has cooled, the cream should be poured in to a large bowl and whisked until soft peaks begin to form. At this stage, the strawberry puree mixture should be folded in to the cream, not stirred in, or a lot of the trapped air will be lost from the cream. This will spoil the final effect of the dish.
The strawberry cream should then carefully be spooned into four serving glasses. A little chocolate should be grated over each, then top each serving with a fresh strawberry. Serve immediately or refrigerate until required.

“Doubtless God could have made a better berry (than the strawberry), but doubtless God never did.”
~William Allen Butler